Toy Storage Creatures to Make
You can make this KKC cute fabric toy storage for your own soft toys or give it away as a gift.
|
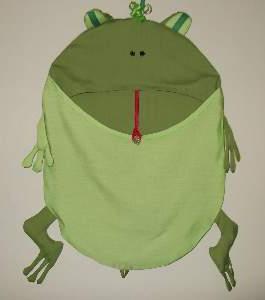
We will start with Freddy our frog. He is not hard to make but you will need to know how to use a sewing machine. After you make him, you can make up 2 other character units to attach underneath each other. Ask someone to help you with this kids crafts project as it requires a level of skill. |
 |
|
Follow the instructions for making him with felt, or the appropriate sections if you are making him with cotton fabric like I did. Soon I will post instructions on how to make Percy the pig and Misty the Mouse as well as other characters to choose from. |
For this homemade toy storage, you will need: |
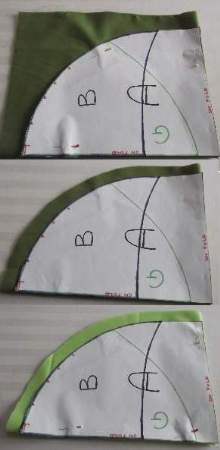 |
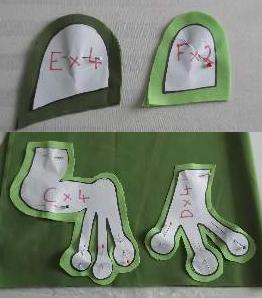
Constructing Toy Storage Download 2 A4 pattern sheets and print them out by signing up to our Free Newsletter and kids Printables. Your will need Pattern 1 and You can cut out the legs and eyes on the first sheet, but only cut around the top right curve, cutting off the corner on the other sheet, then trace out pieces B and G. Cut in half the dark green fabric and fold one half twice. Lay the pattern along the folds where indicated. Your short edge should lay along the double folds. Cut it out adding a 3/4 inch seam allowance. Do the same with the light green fabric. Mark where the legs and eyes will be attached. (Felt or Cotton) |
|
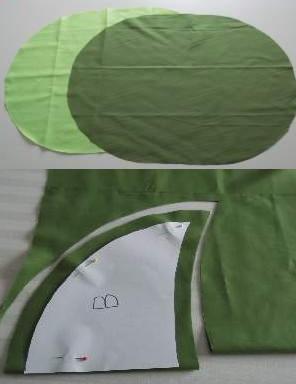
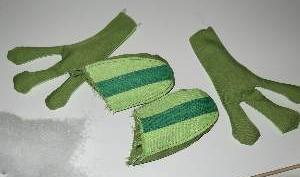
You should have 2 oval shapes one shade of green each. The light green will be for the frogs tummy and the dark green for his back. |
 |
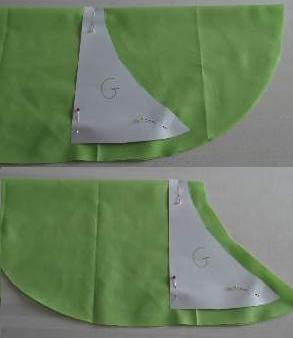 |
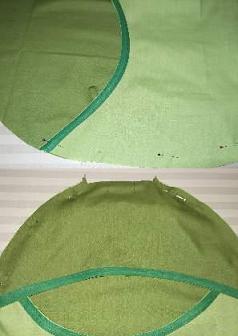
Using the traced G pattern piece, pin and cut AWAY the top part from the green oval like I have done. Remember to leave 3/4" seam allowance Cutting away this section will help form the shape of his mouth which will be the opening for your toy storage unit. |
|
Proceed with the legs, and eyes from the remainder of the light and dark green leftover fabric (but only add seam allowance if you are using cotton, making it 1/4"). |
 |
2 strips of dark green felt (or bias binding if you are using cotton fabric) work well for the eye pupils.
If making this toy storage sounds a bit complicated, don`t worry! When you start to make it,
each step will fall into place and you will understand how to do the next
step. Just remember to follow the instructions depending on the fabric you are
using.
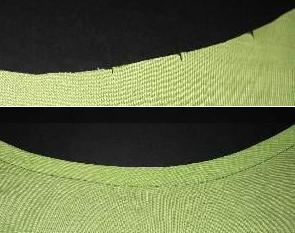 |
Clip along the curved edges of the body front and the head, fold over seam allowance, press and sew along the fold. Do this only if you are using felt. |
|
For the felt front and back legs, pin the pieces wrong sides together and stitch near the edge. Leave the ends open and stuff only a small amount of polyester fiber stuffing. |
 |
For fabric legs, pin right sides together, sew near the edge, turn out, then stuff.
Sew
the felt pupil strips onto the eyes, then sew the eyes onto the lids
but off center. Now stitch the back and front lids together near the
edge, leaving the ends open, and stuff.
For
fabric eyes, sew the pupils down the center of 2 of the eye pieces.
Next, place the eyes with the attached pupils face down onto the
remaining eye pieces. Sew, leaving the straight edge open. Turn them out
and press. Place each one off center onto an eyelid and sew near the
edge. Next take the back and front of each eyelid and sew with right
sides together. Turn right sides out and stuff.
 |
Now pin the limbs and eyes onto the back body piece making sure they are pointing inward and facing the right way. You want them to contrast their color with the body, and pinned at the placement marks. Tack them into place with a needle and thread. |
Once the body is
complete you can stitch on the 2 buttons for the nose, the red cord with
a loop sewn at the end, for the tongue. And the round button that can
represent a bug. Now he looks great!
Cover
the part of the coat hanger that shows with polyester stuffing and wrap
with bias binding to pad it out. I used the glue gun to keep the
binding in place. The loop at the bottom is for hanging the next animal
toy storage once you`ve made it.
Return to Home Page or....see some other sewing crafts.